Can You Upload Your Code to Run on a Faster Machine
The Android Emulator simulates Android devices on your computer so that y'all can test your awarding on a variety of devices and Android API levels without needing to take each concrete device.
The emulator provides well-nigh all of the capabilities of a real Android device. You tin simulate incoming phone calls and text messages, specify the location of the device, simulate different network speeds, simulate rotation and other hardware sensors, access the Google Play Store, and much more.
Testing your app on the emulator is in some ways faster and easier than doing so on a physical device. For example, you can transfer data faster to the emulator than to a device continued over USB.
The emulator comes with predefined configurations for various Android telephone, tablet, Wear OS, and Android TV devices.
Watch the post-obit video for an overview of some emulator features.
You can utilise the emulator manually through its graphical user interface and programmatically through the command line and the emulator console. For a comparison of the features bachelor through each interface, see Comparison of Android Emulator tools.
Requirements and recommendations
The Android Emulator has boosted requirements beyond the basic arrangement requirements for Android Studio, which are described below:
- SDK Tools 26.1.1 or higher
- 64-bit processor
- Windows: CPU with UG (unrestricted guest) support
- HAXM half-dozen.two.1 or later on (HAXM 7.2.0 or later recommended)
The utilise of hardware dispatch has boosted requirements on Windows and Linux:
- Intel processor on Windows or Linux: Intel processor with support for Intel VT-ten, Intel EM64T (Intel 64), and Execute Disable (XD) Bit functionality
- AMD processor on Linux: AMD processor with support for AMD Virtualization (AMD-V) and Supplemental Streaming SIMD Extensions three (SSSE3)
- AMD processor on Windows: Android Studio 3.2 or higher and Windows 10 April 2018 release or higher for Windows Hypervisor Platform (WHPX) functionality
To work with Android viii.1 (API level 27) and college system images, an attached webcam must take the capability to capture 720p frames.
Deprecation for 32-bit Windows systems
The Android Emulator was deprecated in June 2019 for 32-scrap Windows systems. Support for the 32-bit Windows emulator continues until June 2020, including critical bug fixes, merely no new features volition be added. If you are using the emulator on a 32-bit Windows system, you should plan to migrate to a 64-bit Windows system.
If you are using the emulator on a 32-bit Windows arrangement, you lot tin utilise the SDK Managing director to install the latest version of the emulator for 32-bit Windows.
Install the emulator
To install the Android Emulator, select the Android Emulator component in the SDK Tools tab of the SDK Director. For instructions, see Update your tools using the SDK Managing director.
Android virtual devices
Each instance of the Android Emulator uses an Android virtual device (AVD) to specify the Android version and hardware characteristics of the simulated device. To effectively test your app, you should create an AVD that models each device on which your app is designed to run. To create and manage AVDs, utilize the Device Director.
Each AVD functions as an independent device, with its own private storage for user information, SD card, and so on. By default, the emulator stores the user data, SD carte du jour data, and cache in a directory specific to that AVD. When you launch the emulator, it loads the user data and SD menu data from the AVD directory.
Run an app on the Android Emulator
Yous can run an app from an Android Studio project, or you can run an app that'southward been installed on the Android Emulator as you would run any app on a device.
To beginning the Android Emulator and run an app in your project:
- In Android Studio, create an Android Virtual Device (AVD) that the emulator can utilize to install and run your app.
-
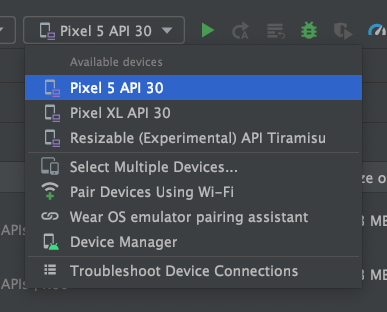
In the toolbar, select the AVD that y'all want to run your app on from the target device drib-downwardly menu.
-
Click Run
 .
.If yous receive an fault or warning message at the top of the dialog, click the link to right the problem or to get more information.
Some errors you must fix earlier you lot tin can keep, such as certain Hardware Accelerated Execution Manager (Intel HAXM) errors.
For macOS, if you see a
Warning: No DNS servers establishmistake when starting the emulator, check to see whether you accept an/etc/resolv.conffile. If y'all don't have this file, enter the following control in a terminal window:ln -s /private/var/run/resolv.conf /etc/resolv.conf
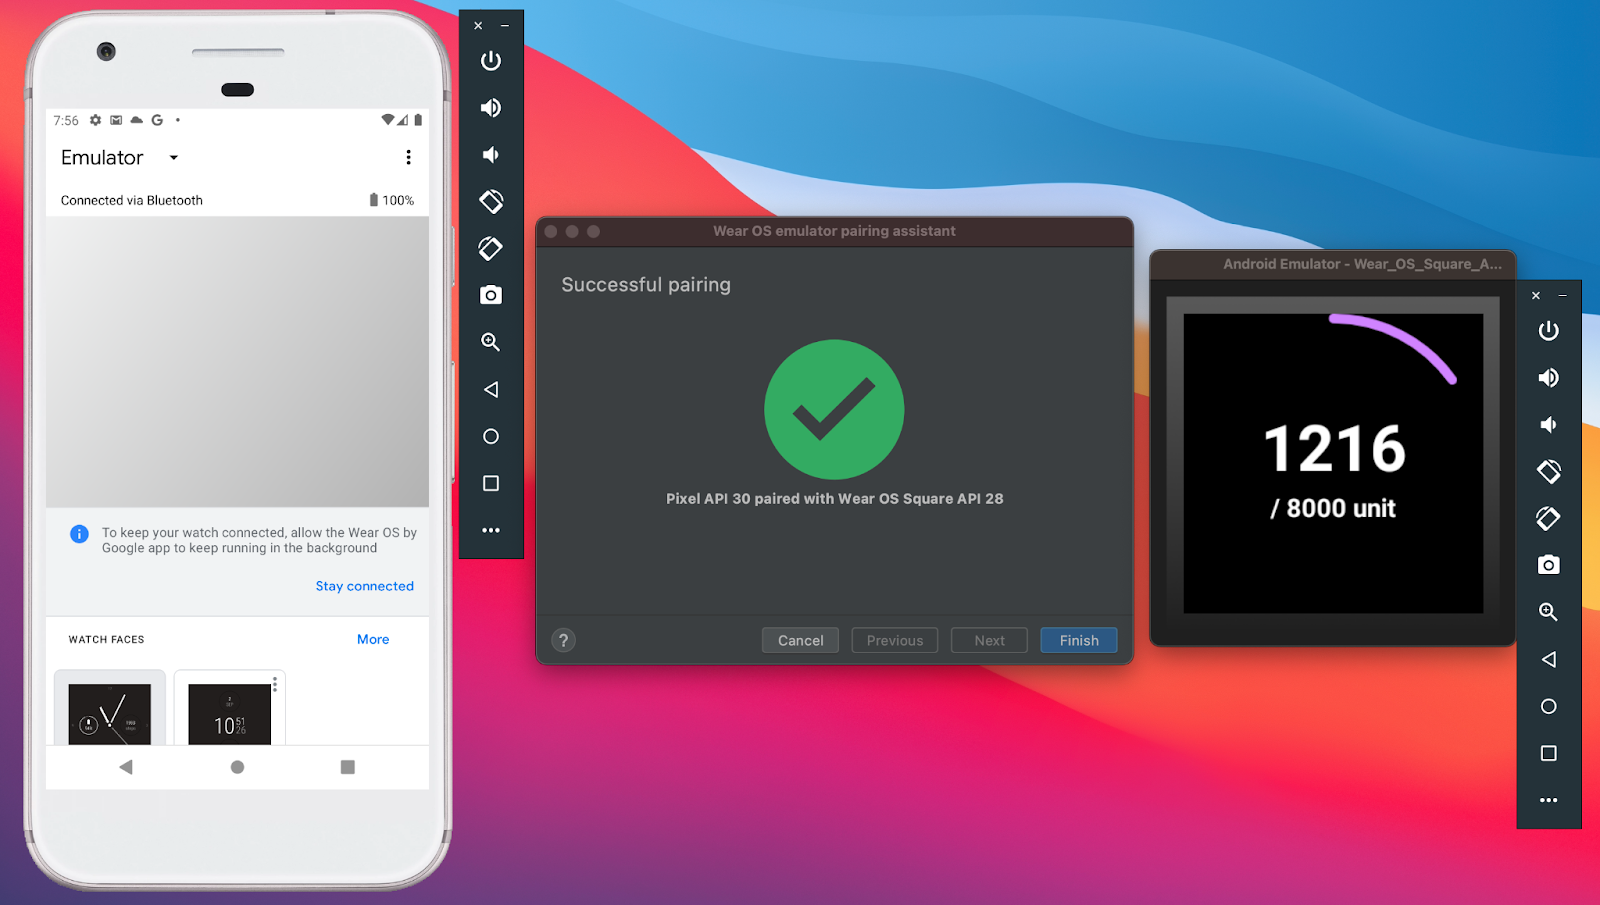
Wear OS pairing assistant
The Wear Os pairing assistant guides y'all step-past-pace through pairing Wearable OS emulators with concrete or virtual phones directly in Android Studio. The assistant can help you become the right Vesture Os Companion app installed on your phone and set up a connexion between the two devices. You tin can get started past going to the device dropdown > Article of clothing OS Emulator Pairing Assistant.
Launch the Android Emulator without get-go running an app
To start the emulator:
-
Open the Device Director.
-
Double-click an AVD, or click Run
.The Android Emulator loads.
While the emulator is running, you can run Android Studio projects and cull the emulator equally the target device. You lot can also drag i or more than APKs onto the emulator to install them, and then run them.
Run the Android Emulator direct in Android Studio
The Android Emulator runs straight inside Android Studio by default. This allows you to conserve screen real estate, navigate quickly between the emulator and the editor window using hotkeys, and organize your IDE and emulator workflow in a single application window.
When the emulator is running, you'll accept admission to common emulator actions like rotating, and extended control options like navigation playback. To run the emulator in a dissever window instead become to File > Settings > Tools > Emulator (Android Studio > Preferences > Tools > Emulator on macOS) and deselect Launch in a tool window.
Limitations
Currently, you can't use the emulator's extended controls when it's running in a tool window. If your development workflow depends heavily on the extended controls, continue to use the Android Emulator as a standalone application. In addition, certain virtual devices—such every bit Android TV and foldable devices—can't be run in Android Studio considering they accept specialized UI requirements or important functions in the extended controls.
Install and add files
To install an APK file on the emulated device, drag an APK file onto the emulator screen. An APK Installer dialog appears. When the installation completes, yous tin can view the app in your apps list.
To add a file to the emulated device, drag the file onto the emulator screen. The file is placed in the /sdcard/Download/ directory. You can view the file from Android Studio using the Device File Explorer, or find it from the device using the Downloads or Files app, depending on the device version.
Snapshots
A snapshot is a stored prototype of an AVD (Android Virtual Device) that preserves the entire country of the device at the time that information technology was saved – including Bone settings, application land, and user data. You can render to a saved arrangement state past loading a snapshot whenever you choose, saving you the fourth dimension of waiting for the operating organisation and applications on the virtual device to restart, likewise as saving you the attempt of bringing your app back to the state at which you want to resume your testing. Starting a virtual device by loading a snapshot is much similar waking a concrete device from a sleep state, as opposed to booting it from a powered-off state.
For each AVD, y'all can have one Quick Boot snapshot and any number of general snapshots.
The simplest manner to have advantage of snapshots is to use Quick Boot snapshots: By default, each AVD is set up to automatically salve a Quick Boot snapshot on exit and load from a Quick Boot snapshot on showtime.
The beginning fourth dimension that an AVD starts, information technology must perform a common cold boot, just like powering on a device. If Quick Boot is enabled, all subsequent starts load from the specified snapshot, and the system is restored to the state saved in that snapshot.
Snapshots are valid for the organization paradigm, AVD configuration, and emulator features with which they are saved. When you make a change in any of these areas, all snapshots of the affected AVD become invalid. Whatever update to the Android Emulator, system epitome, or AVD settings resets the AVD's saved country, so the adjacent fourth dimension y'all get-go the AVD, information technology must perform a common cold boot.
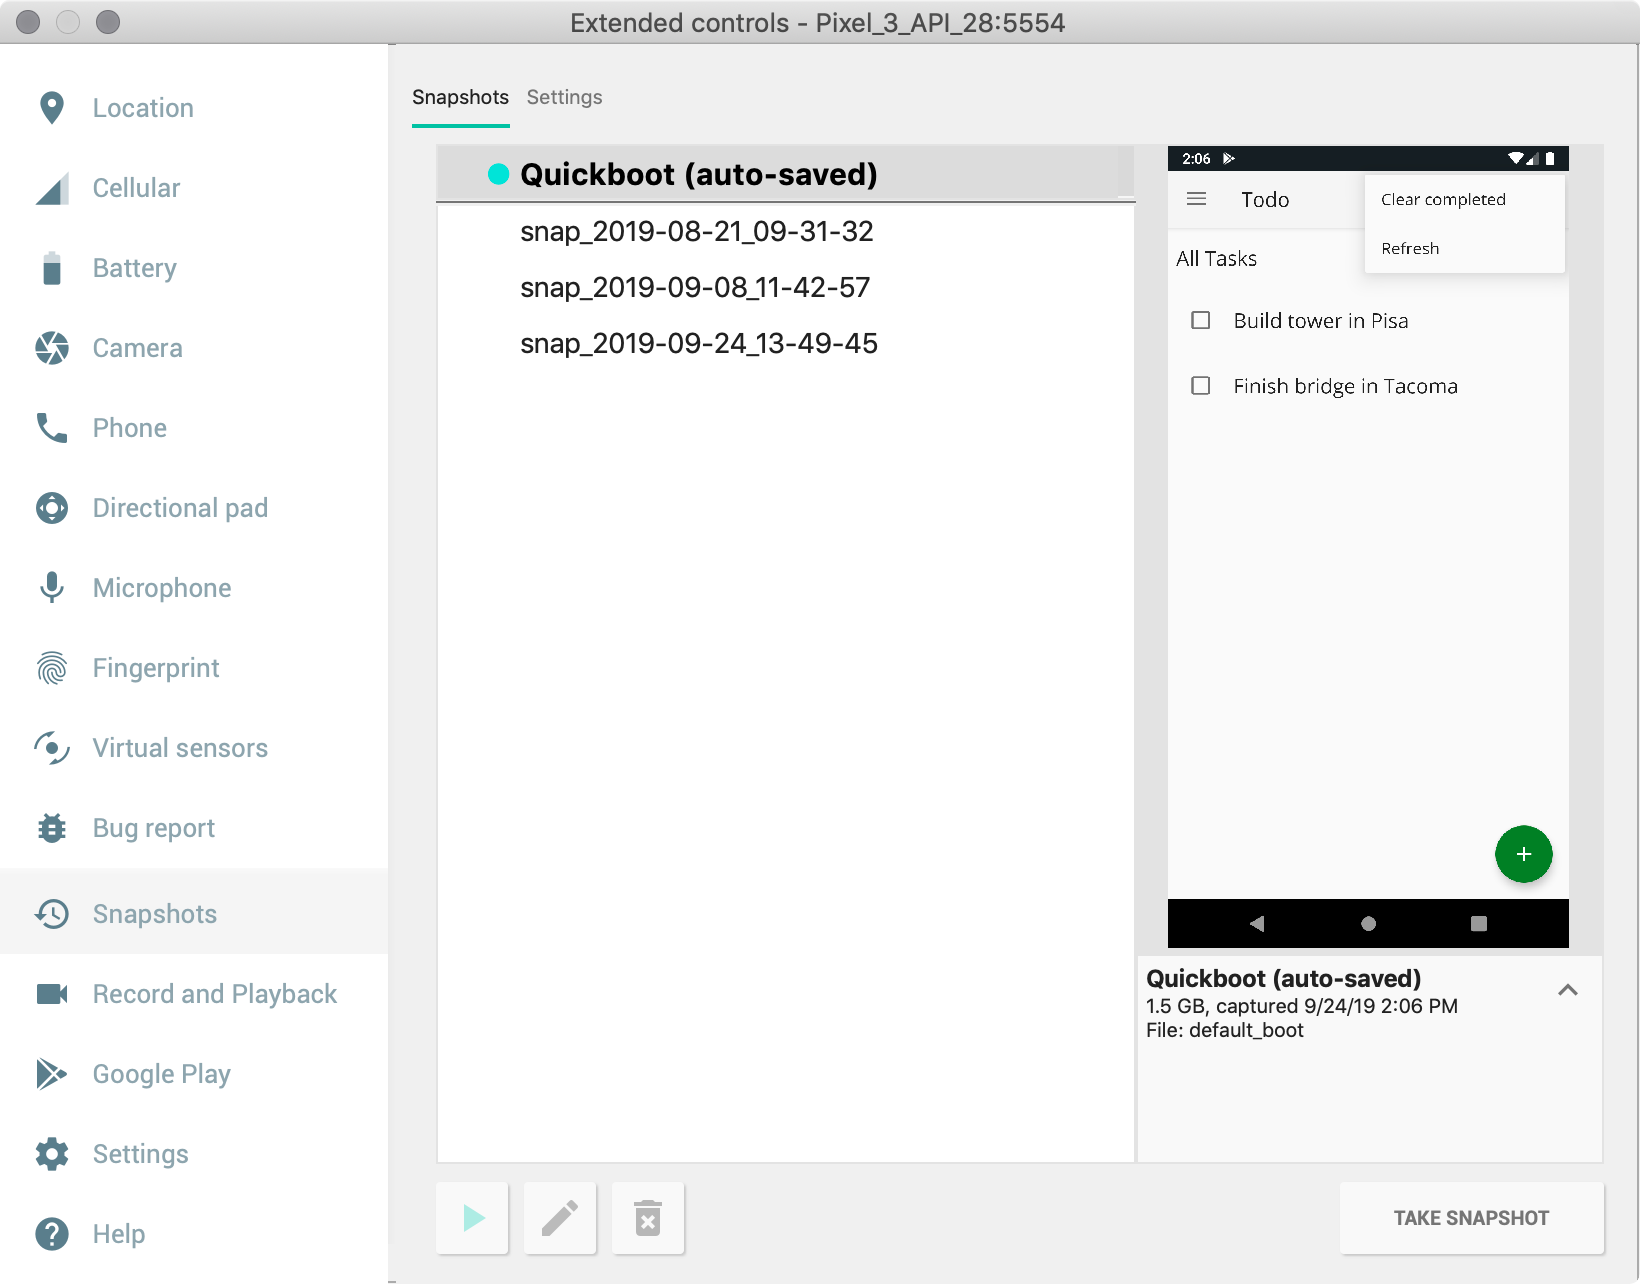
Most controls for saving, loading, and managing snapshots are in the Snapshots and Settings tabs in the Snapshots pane in the emulator's Extended controls window.
You can besides control the Quick Boot options when starting the emulator from the command line.
Relieve Quick Kick snapshots
When you lot close an AVD, you lot can specify whether the emulator automatically saves a snapshot when you close. To command this behavior, proceed every bit follows:
- Open up the emulator'southward Extended controls window.
- In the Snapshots category of controls, navigate to the Settings tab.
-
Apply the Auto-save current state to Quickboot drop-down bill of fare to select i of the following options:
-
Aye: Always salve an AVD snapshot when y'all close the emulator. This is the default.
-
No: Don't save an AVD snapshot when you close the emulator.
-
Your selection applies only to the AVD that is currently open. Yous cannot salvage snapshots while ADB is offline (such equally while the AVD is still booting).
Save general snapshots
Whereas y'all can only accept one Quick Boot snapshot for each AVD, yous can have multiple general snapshots for each AVD.
To save a general snapshot, open the emulator's Extended controls window, select the Snapshots category, and click the Take snapshot button in the lower-right corner of the window.
To edit the name and description of the selected snapshot, click the edit  button at the bottom of the window.
Delete a snapshot
To manually delete a snapshot, open the emulator'southward Extended controls window, select the Snapshots category, select the snapshot, and click the delete  button at the bottom of the window.
You can besides specify whether you would like the emulator to automatically delete snapshots when they become invalid, such as when the AVD settings or emulator version modify. Past default, the emulator will enquire you if you'd like for it to delete invalid snapshots. You can alter this setting with the Delete invalid snapshots carte in the Settings tab of the Snapshots pane.
Load a snapshot
To load a snapshot at whatsoever fourth dimension, open the emulator's Extended controls window, select the Snapshots category, choose a snapshot, and click the load  push at the bottom of the window.
In Android Studio 3.2 and college, each device configuration includes a Boot option control in the advanced settings in the Virtual Device Configuration dialog with which you lot can specify which snapshot to load when starting that AVD.
Disable Quick Boot
If you want to disable Quick Kicking so your AVD e'er performs a cold kicking, do the post-obit:
- Select Tools > Device Manager and click Edit this AVD
 .
. - Click Show Avant-garde Settings and curl down to Emulated Performance.
- Select Cold kicking.
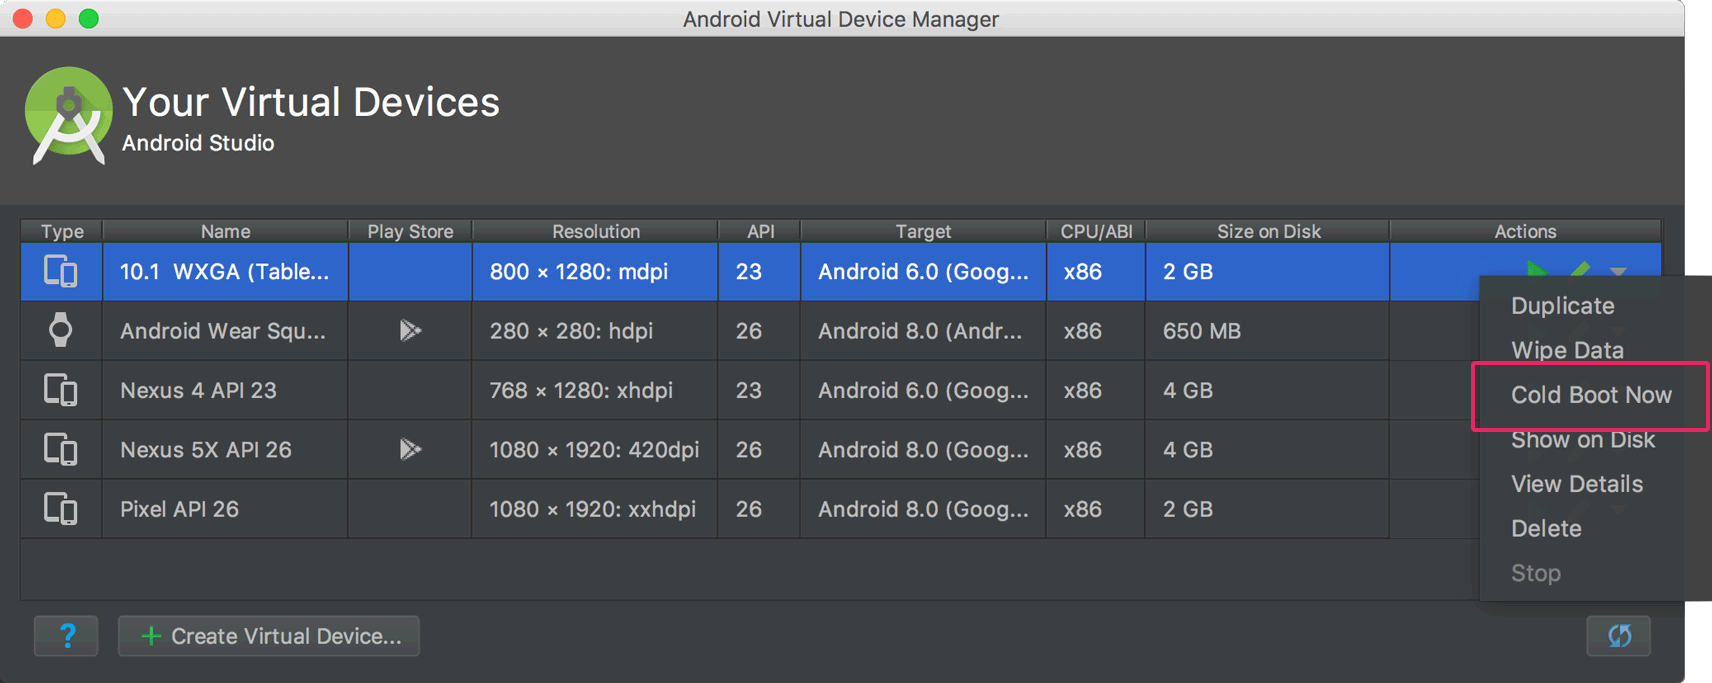
Cold kicking in one case
Instead of disabling Quick Boot completely, you lot can cold kicking just in one case by clicking Cold Boot Now from the AVD'south driblet-downward menu in the Device Manager.
Snapshot requirements and troubleshooting
- Snapshots exercise not work with Android iv.0.4 (API level fifteen) or lower.
- Snapshots do not work with ARM system images for Android 8.0 (API level 26).
- If the emulator fails to kick from a snapshot, select Common cold Boot At present for the AVD in the Device Manager and submit a bug written report.
- Snapshots are not reliable when software rendering is enabled. If snapshots practise not work, click Edit this AVD in the Device Director and modify Graphics to either Hardware or Automatic.
- Loading or saving a snapshot is a memory-intensive operation. If you practise not have enough RAM gratuitous when a load or relieve operation begins, the operating system may swap the contents of RAM to the hd, which can profoundly slow the operation. If you feel very tedious snapshot loads or saves, you may be able to speed these operations by freeing RAM. Closing applications that are not essential for your piece of work is a good mode to free RAM.
Navigate the emulator screen
Use your figurer mouse arrow to mimic your finger on the touchscreen; select menu items and input fields; and click buttons and controls. Use your computer keyboard to blazon characters and enter emulator shortcuts.
Table 1. Gestures for navigating the emulator
| Characteristic | Description |
|---|---|
| Swipe the screen | Signal to the screen, press and hold the chief mouse button, swipe beyond the screen, and then release. |
| Elevate an detail | Point to an item on the screen, press and concur the primary mouse push button, motion the item, and so release. |
| Tap (touch) | Point to the screen, press the principal mouse push, and then release. For example, you could click a text field to start typing in it, select an app, or press a button. |
| Double tap | Point to the screen, press the main mouse push apace twice, and and so release. |
| Touch and hold | Point to an item on the screen, press the principal mouse button, concord, and and so release. For example, you lot could open options for an item. |
| Type | You can type in the emulator past using your estimator keyboard, or using a keyboard that pops up on the emulator screen. For example, you could type in a text field after you selected it. |
| | Pressing Control (Control on Mac) brings up a pinch gesture multi-touch interface. The mouse acts equally the first finger, and across the anchor point is the second finger. Drag the cursor to move the first point. Clicking the left mouse button acts similar touching downwards both points, and releasing acts similar picking both up. |
| Vertical swipe | Open a vertical menu on the screen and apply the scroll wheel (mouse wheel) to scroll through the menu items until you see the one you desire. Click the menu item to select information technology. |
Perform common actions in the emulator
To perform common deportment with the emulator, use the panel on the right side, as described in tabular array 2.
You tin can employ keyboard shortcuts to perform many common actions in the emulator. For a complete list of shortcuts in the emulator, press F1 (Command+/ on Mac) to open the Help pane in the Extended controls window.
Tabular array 2. Common deportment in the emulator
| Feature | Description |
|---|---|
Close | Shut the emulator. |
Minimize | Minimize the emulator window. |
| Resize | Resize the emulator as you would any other operating system window. The emulator maintains an aspect ratio appropriate for your device. |
Power | Click to turn the screen on or off. Click and hold to plow the device on or off. |
Volume upwardly | Click to view a slider control and plough the book up. Click again to turn it upward more than, or use the slider control to alter the volume. |
Volume downward | Click to view a slider command and plow the volume downward. Click once more to plow it down more, or use the slider control to modify the volume. |
Rotate left | Rotate the device 90 degrees counterclockwise. |
Rotate correct | Rotate the device xc degrees clockwise. |
Take screenshot | Click to take a screenshot of the device. For details, see Screenshots. |
 | Click so the cursor changes to the zoom icon. To exit zoom mode, click the button once again. Zoom in and out in zoom way:
To pan in zoom mode, hold Control (Command on Mac) while pressing the arrow keys on the keyboard. To tap the device screen in zoom mode, Command-click (Control-click on Mac). |
Back | Return to the previous screen, or close a dialog box, an options carte du jour, the Notifications panel, or the onscreen keyboard. |
Dwelling | Render to the Home screen. |
| Overview (Recent Apps) | Tap to open a listing of thumbnail images of apps you've worked with recently. To open an app, tap it. To remove a thumbnail from the list, swipe it left or right. This push button isn't supported for Wear OS. |
Fold | For foldable devices, fold the device to brandish its smaller screen configuration. |
Unfold | For foldable devices, unfold the device to display its larger screen configuration. |
| Menu | Press Control+M (Command+M on Mac) to simulate the Bill of fare push button. |
More | Click to access other features and settings, described in the next table. |

Screen recording
You can record video and sound from the Android Emulator and salvage the recording to a WebM or animated GIF file.
The screen recording controls are in the Screen record tab of the Extended Controls window.
Tip: You tin can also open the screen recording controls by pressing Command + Shift + R (Command + Shift + R on Mac).
To begin screen recording, click the Start recording push in the Screen record tab. To stop recording, click End recording.
Controls for playing and saving the recorded video are at the bottom of the Screen tape tab. To salvage the video, cull WebM or GIF from the carte at the lesser of the tab and click Save.
You can also record and save a screen recording from the emulator using the post-obit command on the control line:
adb emu screenrecord start --time-limit ten [path to save video]/sample_video.webm
Screenshots
To take a screenshot of the virtual device, click the Take screenshot button.
The emulator creates a PNG file with the name Screenshot_yyyymmdd-hhmmss.png using the year, calendar month, day, hour, minute, and 2nd of the capture. For example, Screenshot_20160219-145848.png.
By default, the screenshot is saved on your computer desktop. To change the location to which screenshots are saved, use the Screenshot relieve location control in the Settings category in the emulator'southward Extended controls window.
You can also take screenshots from the command line with either of the following commands:
-
screenrecord screenshot [destination-directory] -
adb emu screenrecord screenshot [destination-directory]
Camera back up
The emulator supports the use of basic camera functionality on your virtual device for earlier Android versions. Android eleven and higher supports the following additional Android Emulator camera capabilities:
- RAW capture
- YUV reprocessing
- Level 3 devices
- Logical photographic camera support
- Emulating sensor orientation by using data from the sensor manager
- Applying video stabilization by reducing handshake frequency
- Applying border enhancement by removing the upscaling usually done in the YUV pipeline
- Concurrent cameras
Virtual scene camera and ARCore
You can use the virtual scene camera in a virtual environment to experiment with augmented reality (AR) apps made with ARCore.
For information on using the virtual scene camera in the emulator, see Run AR apps in Android Emulator.
When using the emulator with a photographic camera app, you tin import an image in PNG or JPEG format to exist used within a virtual scene. To choose an image for utilize in a virtual scene, click Add together paradigm in the Camera > Virtual scene images tab in the Extended controls window. This feature tin can be used to import custom images such as QR codes for use with any camera-based app. For more than information, see Add Augmented Images to the scene.
Test common AR actions with macros
You can greatly reduce the time it takes to exam common AR actions by using the preset macros in the emulator. For case, you can use a macro to reset all the device's sensors to their default land.
Before using macros, follow the steps in Run AR apps in Android Emulator to ready up the virtual scene photographic camera for your app, run your app on the emulator, and update ARCore. Then, follow these steps to use emulator macros:
- With the emulator running and your app continued to ARCore, click More than
 in the emulator panel.
 - Select Record and Playback > Macro Playback.
-
Choose a macro that you want to employ, and then click Play.
During playback, y'all can interrupt a macro by clicking Stop.
Extended controls, settings, and help
Use the extended controls to send data, change device backdrop, control apps, and more. To open up the Extended controls window, click More than in the emulator panel.
Y'all tin utilize keyboard shortcuts to perform many of these tasks. For a complete list of shortcuts in the emulator, press F1 (Command+/ on Mac) to open up the Assistance pane.
Table three. Extended controls details
| Feature | Description |
|---|---|
| Location | The emulator lets you simulate "my location" information: the location where the emulated device is currently located. For case, if you click My Location Controls for the device'south location information are organized under ii tabs: Unmarried points and Routes. Single points In the Single points tab, y'all tin can apply the Google Maps webview to search for points of interest, just as you lot would when using Google Maps on a phone or in a browser. When you lot search for (or click on) a location in the map, you tin relieve the location by selecting Save bespeak near the bottom of the map. All of your saved locations are listed on the correct side of the Extended controls window. To ready the emulators location to the location you take selected on the map, click the Gear up location button near the bottom right of the Extended controls window. Routes Like to the Single points tab, the Routes tab provides a Google Maps webview that yous can apply to create a route between 2 or more locations. To create and salve a route, exercise the following:
To simulate the emulator following the route you lot saved, select the route from the list of Saved routes and click Play road near the bottom right of the Extended controls window. To stop the simulation, click Finish route. To continuously simulate the emulator following the specified route, enable the switch next to Repeat playback. To alter how quickly the emulator follows the specified route, select an option from the Playback speed dropdown. Import GPX and KML information To use geographic data from a GPS exchange format (GPX) or Keyhole Markup Language (KML) file:
The speed defaults to the Filibuster value (Speed 1X). You can increase the speed by double (Speed 2X), triple (Speed 3X), and and so on. |
| Displays | The emulator allows you to deploy your app to multiple displays, which support customizable dimensions and tin assistance you test apps that support multi- window and multi- display. While a virtual device is running, you tin add together upwardly to ii additional displays as follows:
|
| Cellular | The emulator lets you simulate diverse network conditions. You can estimate the network speed for different network protocols, or you can specify Total, which transfers data as quickly as your computer allows. Specifying a network protocol is always slower than Full. You tin likewise specify the voice and data network status, such equally roaming. The defaults are gear up in the AVD. Select a Network type:
Select a Signal strength:
Select a Voice status, Data status, or both:
|
| Battery | You tin can simulate the battery properties of a device to see how your app performs under unlike conditions. To select a Charge level, use the slider control. Select a Charger connection value:
Select a Bombardment health value:
Select a Battery condition value:
|
| Telephone | The emulator lets you simulate incoming phone calls and text messages. To initiate a call to the emulator:
To transport a text bulletin to the emulator:
|
| Directional Pad | If the AVD has the directional pad enabled in the hardware profile, yous can use the directional pad controls with the emulator. Even so, not all devices tin can support the directional pad; for example, an Android watch. The buttons simulate the following deportment:  |
| Fingerprint | This control can simulate 10 dissimilar fingerprint scans. Y'all tin can use it to test fingerprint integration in your app. This feature is disabled for Android 5.i (API level 22) and lower, and for Wearable OS. To simulate a fingerprint scan on the virtual device:
|
| Virtual sensors > Accelerometer | This control lets yous test your app against changes in device position, orientation, or both. For example, you can simulate gestures such as tilt and rotation. The accelerometer doesn't track the accented position of the device: it but detects when a change is occurring. The control simulates the fashion accelerometer and magnetometer sensors would answer when you move or rotate a existent device. You must enable the accelerometer sensor in your AVD to use this control. The command reports The control as well reports To rotate the device around the x, y, and z axes, select Rotate and do one of the following:
See Calculating the device's orientation for more information nearly how yaw, pitch, and roll are calculated. To move the device horizontally (x) or vertically (y), select Motility and do one of the post-obit:
To position the device at 0, 90, 180, or 270 degrees:
As yous adjust the device, the Resulting values fields alter accordingly. These are the values that an app can admission. For more than information about these sensors, encounter Sensors overview, Motion sensors, and Position sensors. |
| Virtual sensors > Boosted sensors | The emulator can simulate various position and environment sensors. It lets you accommodate the following sensors so you tin exam them with your app:
For more information well-nigh these sensors, see Sensors overview, Position sensors, and Environment sensors. |
| Snapshots | Run across Snapshots. |
| Screen record | See Screen recording. |
| Settings > General |
|
| Settings > Proxy | By default, the emulator uses the Android Studio HTTP proxy settings, but this screen allows you lot to manually define an HTTP proxy configuration for the emulator. For more information, see Using the emulator with a proxy. |
| Settings > Advanced |
|
| Assist > Keyboard Shortcuts | This pane provides a complete list of keyboard shortcuts for the emulator. To open this pane while working in the emulator, press F1 (Command+/ on Mac). For the shortcuts to piece of work, the Send keyboard shortcuts selection in the General settings pane must be set to Emulator controls (default). |
| Help > Emulator Help | To go to the online documentation for the emulator, click Documentation. To file a bug against the emulator, click Transport feedback. For more than information, see how to report emulator bugs. |
| Help > About | Come across which adb port the emulator uses, as well as the Android and emulator version numbers. Compare the latest available emulator version with your version to decide if you lot accept the latest software installed. The emulator serial number is emulator- adb_port, which you can specify as an adb control line choice, for case. |
 in Google Maps and then send a location, the map shows it.
 Wi-Fi
When using an AVD with API level 25 or college, the emulator provides a simulated Wi-Fi admission point ("AndroidWifi"), and Android automatically connects to it.
You lot can disable Wi-Fi in the emulator by running the emulator with the control-line parameter -characteristic -Wifi.
Limitations
The Android Emulator doesn't include virtual hardware for the following:
- Bluetooth
- NFC
- SD card insert/squirt
- Device-attached headphones
- USB
The watch emulator for Article of clothing Os doesn't provide the Overview (Recent Apps) button, D-pad, and fingerprint sensor.
Source: https://developer.android.com/studio/run/emulator
0 Response to "Can You Upload Your Code to Run on a Faster Machine"
Post a Comment